
Raymarching Material 101: Mastering An Advanced three.js Technique
Abstract
Ever found yourself on ShaderToy, awestruck by the complex visuals created with shaders and wondered how to incorporate such shaders into your web-based three.js projects? You're about to embark on a journey that explores the powerful technique of raymarching, a cornerstone of many stunning 3D web experiences. This guide will navigate you through integrating both ShaderToy shaders and your own creations into the three.js framework, enriching your projects with unparalleled visual depth.
Disclaimer: While I navigate the realms of three.js and raymarching with keen interest, I consider myself at the beginning of this journey, mastering enough to integrate raymarching into three.js effectively. For those looking to dive deeper into raymarching's theoretical underpinnings, I recommend resources such as TheArtOfCode's YouTube Channel (opens in a new tab) or Michael Walczyk's blog (opens in a new tab). Our focus here is squarely on the practical integration of these techniques within the vibrant ecosystem of three.js.
I welcome your feedback, questions, and insights. If you've encountered any uncertainties, spotted typos, or simply wish to share your thoughts, reaching out on Twitter (opens in a new tab) is greatly appreciated. Your interaction fuels this shared exploration of 3D web development and creative coding.
Thank you for joining this explorative venture into enhancing three.js projects with the dynamic capabilities of raymarching and shaders. ✨
Process introduction 📐
Reminder: What is raymarching in first place?
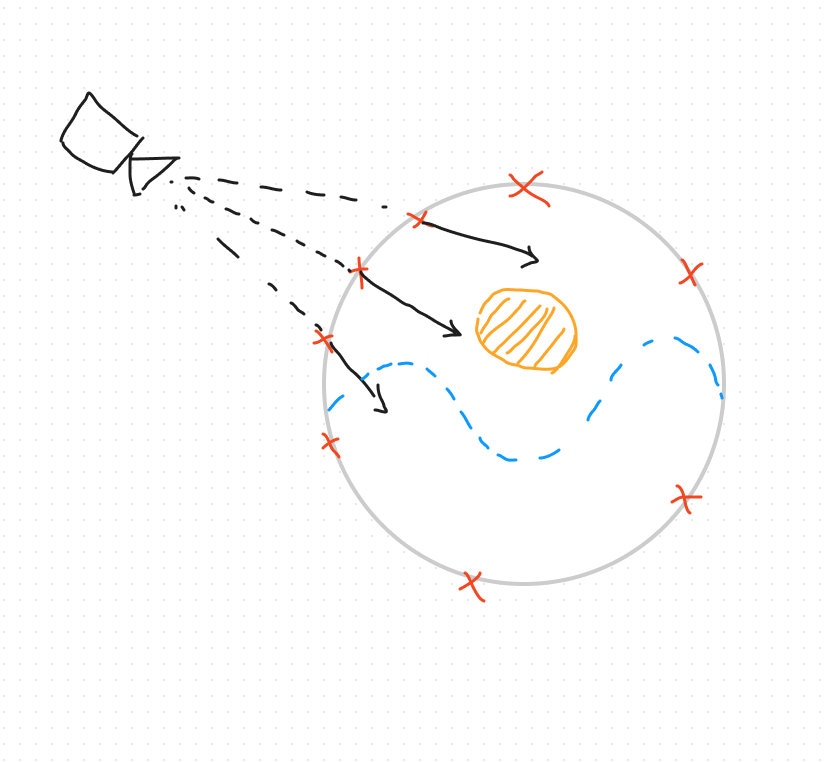
It's a technique that involves view rays extrapolated from the camera, along which we are going to march forward, to see if there is intersections with specific surfaces. These specific surfaces are defined by SDF (a.k.a. Signed distance functions). A ray is composed of two properties: An origin (the starting point) and a direction. The raymarching algorithm will take in input these two components.
If all of this is really new to you, you may have trouble to follow along, because I don't go in depth about the raymarching theory. Go back to the abstract and follow the links I put for you !
How to get the rays properties?
Let's put aside how we get the rays for a moment, and remember about the rendering pipeline.
First, our vertex shader will run on each vertex of our primitive. Then, down the rendering pipeline, we get a lot of fragments. On each fragment, the fragment shader will be runned, with in inputs some interpolated values coming from the vertex shader.
In each fragment, we will run the raymarcher. So basically, in each fragment, we will get a different ray, that we will follow along. Then, we will test intersections inside the raymarching loop, and determine the pixel color that we need to render in this direction.
The plan to make our raymarcher work in the context of three.js is to calculate each ray in the vertex shader from the real three.js camera. Then, pass down to the fragment shader through varying the ray origin and the ray direction.
**Reminder: The fragment shader will interpolate the values passed in varying. For the ray origin, it is the camera position for everyone, so it will be a constant value. For the ray direction, it will be interpolated from the calculation done in the vertex shader. Each fragment will have a specific ray direction. It is exactly what we need to make the raymarcher work in our context ! **
A little drawing could help no ?
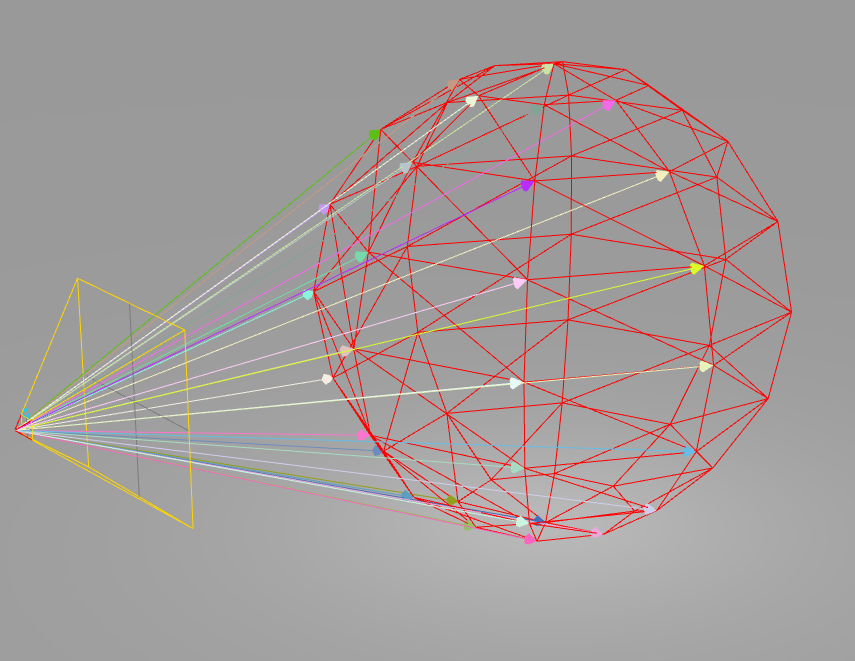
Each arrow you see on the picture is a ray. It is basically what will happen in the vertex shader. Each arrow will be the result of the vertex shader calculation. Then each arrow will be interpolated before feeding the fragment shader.
The formulas for the ray is very simple:
The ray origin is the camera world position or the vertex local position depending of the raymarching effect you want. Taking the local vertex position will ensure that you have the same effect even if you move the sphere around in the scene. Taking the camera world position will make the effect inside different depending on the position of the object in the world space.
There is no right or wrong, just matter of the effect you want to be performed in the sphere.
The ray direction is given by rayDirection = normalize(vertexWorldPosition - cameraWorldPosition). Just make sure that you have every coordinates in the same space.
We normalize the vector, to have a unit length.
Implementation ⚙️
Beginning of the implementation
Setting up the material
First, we need to create a shader material. We will pass the vertex and fragment shader as strings.
Add the update of the uniform
Don't forget to add the update part of the uTime uniforms in the render loop
Vertex shader
First we calculate the world position of the vertex by multiplying the modelMatrix to the vertex coordinates.
Then we prepare the varyings that will be interpolated before the fragment shader. vDirection is the ray direction from the camera to the vertex world position like we talked about in the previous section. vPosition is the ray origin. It is the position of the vertex in local space so we ensure that the effect is local to the sphere, and not depending on the position in world space or the camera in world space.
Basically, it is what we are trying to build.
Raymarching algorithm
Setting up the raymarcher
We will use TheArtOfCode raymarcher for it. Like I said, if you are not familiar with the code of the raymarching algorithm, check out his videos. Here, a part of the fragment shader.
Wire everything in the main of the fragment shader
Basically we are calculating a distance in a direction from an origin point. We are marching forward until we hit something in our abstract space, or until we are pass the maximum distance. We save this distance d.
We can then calculate the current position that we marched to by doing rayOrigin + rayDirection * d (We marched for a distance d along the ray direction, starting from the rayOrigin).
We then ask for the light at the current position, which will be our color.
We do this for every ray generated by every fragment shader running. From there, we can determine every fragment color, which determine every pixel color for the mesh.
What to take off from this blog post ?
As we wrap up our exploration of raymarching and its application in three.js, I hope you find yourself equipped with new insights and inspired to push the boundaries of 3D web development further. This journey into the intricate world of three.js and raymarching algorithms is just the beginning of what you can achieve in the realm of digital creativity.
You can go on ShaderToy to experiment on raymarching algorithm. I did the experimentation with a cool sea shader I found here:
All you need to do is seek for the raymarching algorithm. Replace the main function by our main, with the calculation of the ray origin and ray direction relative to the three.js camera. And you can get this type of cool effect on your three.js sphere !
Initial shader
This is the initial shader that we will modify to make it work in three.js.
The naming convention are different, we don't need the iMouse, the camera ray is impacted by our OrbitControls.
Go to the next step to get the full fragment shader that can be used in three.js.
_218// afl_ext 2017-2024_218// MIT License_218_218// Use your mouse to move the camera around! Press the Left Mouse Button on the image to look around!_218_218#define DRAG_MULT 0.38 // changes how much waves pull on the water_218#define WATER_DEPTH 1.0 // how deep is the water_218#define CAMERA_HEIGHT 1.5 // how high the camera should be_218#define ITERATIONS_RAYMARCH 12 // waves iterations of raymarching_218#define ITERATIONS_NORMAL 37 // waves iterations when calculating normals_218_218#define NormalizedMouse (iMouse.xy / iResolution.xy) // normalize mouse coords_218_218// Calculates wave value and its derivative,_218// for the wave direction, position in space, wave frequency and time_218vec2 wavedx(vec2 position, vec2 direction, float frequency, float timeshift) {_218 float x = dot(direction, position) * frequency + timeshift;_218 float wave = exp(sin(x) - 1.0);_218 float dx = wave * cos(x);_218 return vec2(wave, -dx);_218}_218_218// Calculates waves by summing octaves of various waves with various parameters_218float getwaves(vec2 position, int iterations) {_218 float wavePhaseShift = length(position) * 0.1; // this is to avoid every octave having exactly the same phase everywhere_218 float iter = 0.0; // this will help generating well distributed wave directions_218 float frequency = 1.0; // frequency of the wave, this will change every iteration_218 float timeMultiplier = 2.0; // time multiplier for the wave, this will change every iteration_218 float weight = 1.0;// weight in final sum for the wave, this will change every iteration_218 float sumOfValues = 0.0; // will store final sum of values_218 float sumOfWeights = 0.0; // will store final sum of weights_218 for(int i=0; i < iterations; i++) {_218 // generate some wave direction that looks kind of random_218 vec2 p = vec2(sin(iter), cos(iter));_218_218 // calculate wave data_218 vec2 res = wavedx(position, p, frequency, iTime * timeMultiplier + wavePhaseShift);_218_218 // shift position around according to wave drag and derivative of the wave_218 * createRotationMatrixAxisAngle(vec3(1.0, 0.0, 0.0), 0.5 + 1.5 * (((NormalizedMouse.y == 0.0 ? 0.27 : NormalizedMouse.y) * 1.0) * 2.0 - 1.0))
Three.js fragment shader
Be sure to make these changes to bind the convention of three.js to the shadertoy shader.
uTimepositions to change: 1 2uMousefixing the mouse: 1uResolutionpositions to change: 1 2mainImagetomain: 1gl_FragColorpositions to change: 1 2
_231_231uniform float uTime;_231uniform vec2 uResolution;_231_231varying vec3 vPosition;_231varying vec3 vDirection;_231varying vec3 vNormal;_231_231#define MAX_STEPS 100_231#define MAX_DISTANCE 100._231#define SURFACE_DISTANCE .001_231_231_231// afl_ext 2017-2024_231// MIT License_231_231// Use your mouse to move the camera around! Press the Left Mouse Button on the image to look around!_231_231#define DRAG_MULT 0.38 // changes how much waves pull on the water_231#define WATER_DEPTH 1.0 // how deep is the water_231#define CAMERA_HEIGHT 1.5 // how high the camera should be_231#define ITERATIONS_RAYMARCH 12 // waves iterations of raymarching_231#define ITERATIONS_NORMAL 37 // waves iterations when calculating normals_231_231#define NormalizedMouse (vec2(0.).xy / uResolution.xy) // normalize mouse coords_231_231// Calculates wave value and its derivative,_231// for the wave direction, position in space, wave frequency and time_231vec2 wavedx(vec2 position, vec2 direction, float frequency, float timeshift) {_231 float x = dot(direction, position) * frequency + timeshift;_231 float wave = exp(sin(x) - 1.0);_231 float dx = wave * cos(x);_231 return vec2(wave, -dx);_231}_231_231// Calculates waves by summing octaves of various waves with various parameters_231float getwaves(vec2 position, int iterations) {_231 float wavePhaseShift = length(position) * 0.1; // this is to avoid every octave having exactly the same phase everywhere_231 float iter = 0.0; // this will help generating well distributed wave directions_231 * createRotationMatrixAxisAngle(vec3(1.0, 0.0, 0.0), 0.5 + 1.5 * (((NormalizedMouse.y == 0.0 ? 0.27 : NormalizedMouse.y) * 1.0) * 2.0 - 1.0))
_218// afl_ext 2017-2024_218// MIT License_218_218// Use your mouse to move the camera around! Press the Left Mouse Button on the image to look around!_218_218#define DRAG_MULT 0.38 // changes how much waves pull on the water_218#define WATER_DEPTH 1.0 // how deep is the water_218#define CAMERA_HEIGHT 1.5 // how high the camera should be_218#define ITERATIONS_RAYMARCH 12 // waves iterations of raymarching_218#define ITERATIONS_NORMAL 37 // waves iterations when calculating normals_218_218#define NormalizedMouse (iMouse.xy / iResolution.xy) // normalize mouse coords_218_218// Calculates wave value and its derivative,_218// for the wave direction, position in space, wave frequency and time_218vec2 wavedx(vec2 position, vec2 direction, float frequency, float timeshift) {_218 float x = dot(direction, position) * frequency + timeshift;_218 float wave = exp(sin(x) - 1.0);_218 float dx = wave * cos(x);_218 return vec2(wave, -dx);_218}_218_218// Calculates waves by summing octaves of various waves with various parameters_218float getwaves(vec2 position, int iterations) {_218 float wavePhaseShift = length(position) * 0.1; // this is to avoid every octave having exactly the same phase everywhere_218 float iter = 0.0; // this will help generating well distributed wave directions_218 float frequency = 1.0; // frequency of the wave, this will change every iteration_218 float timeMultiplier = 2.0; // time multiplier for the wave, this will change every iteration_218 float weight = 1.0;// weight in final sum for the wave, this will change every iteration_218 float sumOfValues = 0.0; // will store final sum of values_218 float sumOfWeights = 0.0; // will store final sum of weights_218 for(int i=0; i < iterations; i++) {_218 // generate some wave direction that looks kind of random_218 vec2 p = vec2(sin(iter), cos(iter));_218_218 // calculate wave data_218 vec2 res = wavedx(position, p, frequency, iTime * timeMultiplier + wavePhaseShift);_218_218 // shift position around according to wave drag and derivative of the wave_218 * createRotationMatrixAxisAngle(vec3(1.0, 0.0, 0.0), 0.5 + 1.5 * (((NormalizedMouse.y == 0.0 ? 0.27 : NormalizedMouse.y) * 1.0) * 2.0 - 1.0))
I have implemented it in a react three fiber project, you can see the result below:
The shader would be the same in three.js if you are a vanilla user or if you use any other type of three.js framework on top. Once you understand the translation steps, you can adapt this technique to any 3D context that you are working on.
Mastering Raymarching with Three.js
The journey through ShaderToy and the integration of raymarching algorithms into your three.js projects opens up a world of possibilities. The convergence of these technologies enables you to create more dynamic, interactive scenes and objects, enriching the user experience on the web. Embracing these techniques not only boosts your skillset but also places you at the forefront of innovative web development.
The path to mastery is paved with trial, error, and continuous learning. As you experiment and refine your approach, remember that every challenge is an opportunity to grow. The field of 3D web development is ever-evolving, and your contributions—no matter how small they might seem—are valuable steps forward in this exciting journey.
Looking Forward
I encourage you to view this post as a stepping stone towards achieving mastery in 3D web development with three.js. The principles of raymarching and their application within the three.js framework have the potential to transform your projects into immersive experiences that captivate and engage users.
Keep exploring, experimenting, and challenging yourself. The more you learn and apply, the more proficient you'll become. And as you progress, share your discoveries and creations with the community. Together, we can push the boundaries of what's possible in 3D web development. If you liked this article, you can also check out my other articles on the depth buffer and the indexed geometry in three.js and react three fiber.
Thank you for spending this time with me. I look forward to seeing where your creativity and technical prowess will take you next in the world of three.js and beyond.